Are You & Your Horse Ready For Bitting Advice? The Steps You Need To Consider First
Equestrian Advice & Guides All Disciplines
Build your business profile for FREE and expose your services to thousands of potential clients!
Create my profile now!
In my last article, 'The Scales Of Training - For The Rider', I wrote about the rider's seat. Now I would like to follow up with the rider’s aids; how we communicate and how we influence our horse. The rider can only give correct aids if they can sit in balance, are supple and able to adapt to the horse's movement.
As riders, we influence the horse with our seat, legs and reins. These aids form the basis of our communication with the horse. In order to be able to purposefully use them, we need to know exactly how they affect the horse.
I should probably explain that some of the terminology in this article may seem strange or foreign to you... that’s because it is! I am describing the German system and how they categorise aiding. Their terminology is not always easy to translate.
| SEAT AIDS | LEG AIDS | REIN AIDS |
|---|---|---|
| More weight on one side | Forward aiding | Giving |
| Equal weight on both sides | Forward and sideways aiding | Restraining |
| Lightening of seat | Controlling | Holding |
| Controlling | ||
| Motioning sideways |
Naturally, seat and leg aids ask the horse to move forward, rein aids restrain it. The aim of giving aids correctly is to make them less and less visible to the observer, but the horse, on the other hand, perceives them more intensely. Seat, leg and rein aids are always given together.
A few important points:
If the rider is capable of a calm and supple seat, the horse will find it easier to react to their aids. The rider must also be able to keep their centre of gravity in balance with the horse's centre of gravity during its movement. Such a rider is much more pleasant for the horse as they do not disturb the horse.
 We put weight on both seat bones when we want to activate the horse’s hind legs. Equal weight on both sides together with forward driving leg aids gives the horse an impulse to step further under its centre of gravity. To be able to give a correct seat aid the rider needs to sit naturally upright. They then tense their back and abdominal muscles – their core – for a moment.
This tension of the centre of the body must not be constant. This would just block the horse and dull it and simply makes the rider rigid and tense. As an aid, the use of the rider’s core is performed correctly if it is invisible to the viewer. When the rider starts to lean back, pull their thighs and knees up and move their lower legs forward, it's wrong.
We will use the seat aid with weight on both sides in all half halts, therefore in all transitions.
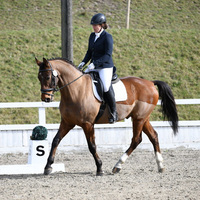
The seat aid with more weight on one side is used to support our leg and rein aids every time we want to flex or bend the horse. The rider needs to put more weight on the inside seat bone; the hip and knee will be slightly lowered and there will be a little more weight in the inside stirrup.
 This picture shows what happens if the rider uses the one-sided seat aid incorrectly. The rider is leaning their body too far into their desired direction of travel, meaning that instead of putting more weight onto their inside seat bone, they end up doing the opposite; pushing their seat towards the outside, resulting in their knee and inside hip being pulled up. The horse therefore feels more weight on its outside and can misread the aid. This mistake is very common and needs to be corrected with help of an experienced instructor. Some things that can help include lessons on the lunge, the use of Franklin balls, resistance bands and exercises on the ground.
(Photo credit: www.pferd-aktuell.de)
We use the lightening of the seat when we need to take weight off the horse’s back, for example when working with a young horse. The rider needs to put more weight onto their thighs and into the stirrups; their upper body should bend forward, how much depends on how much they want to lighten their seat.
Legs always ask the horse to move forward.
The forward aiding lower leg lies freely, just behind the girth. Because it lies on the horse’s body, the aid is given when the horse’s belly swings left and right when in motion, so the horse basically aids itself. A short tensing of the calf muscles will encourage the horse to step further forward with the hind leg on that side. The aid works in the moment when the horse lifts its hind leg.
The forward and sideways aiding leg aid makes the corresponding hind leg (or diagonally the hind and foreleg) step forward and sideways at the same time. The rider can move their lower leg back about one hand’s width, but they must not pull it up.
The controlling leg lies about a hand’s width behind the girth. It is not an active aid; it prevents or restricts the hind legs from moving sideways.
|
|
|
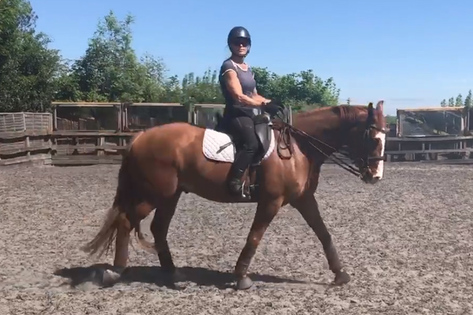
| The forward aiding lower leg lies just behind the girth. | The controlling leg lies about a hand’s width behind the girth. |
Common leg postition mistakes include...
|
|
|
| Heel, knee and thigh pulled up. This is often seen when the horse doesn't respond to a forward leg aid. | Heel pushed down, lower leg too far forward. This is often seen when children ride stronger ponies*. |
*This is usually seen in combination with leaning back and pulling on the reins. The problem with this is that it will likely turn into a habit which is then hard to correct.
Common mistakes for the position of the foot in the stirrup include...
|
|
|
|
| The foot isn't far enough into the stirrup. Often seen in combination with the above; heel pushed too far down and lower leg too far forward. | The foot isn't straight in the stirrup. Riders often twist their foot slightly inside the stirrup or turn both their foot and the stirrup out. | Here we have the opposite problem; the foot is pushed too far into the stirrup. This foot postition will result in a stiff ankle for the rider. |
Giving leg aids correctly
It is important that the rider feels the movement of the horse's hind legs in order to be able to aid correctly. The leg aid can only work whilst the horse is lifting a leg, so it has to be given in the moment its hip is lowered. The horse's torso swings naturally from side to side, which helps us: in the walk the rider’s leg touches the horse’s belly on its own. The rider can support this movement by giving short impulses with their lower legs. This will activate the corresponding hind leg. If we want to keep the horse sensitive to our aids, we should only increase the strength of our aids if the horse is slow or lazy. The leg aid must always be used consciously; the rider must never kick unknowingly. This is the same in the trot; if we want a more diligent forward movement, we must not push strongly all the time. If you keep kicking a horse, you will only dull them. Instead, the leg aid should come repeatedly, if necessary, strengthened only by a short tensing of the calf muscle.
This alternating leg aid is of course more difficult to do in the trot, because it is a lot harder to feel the movement of the hind legs. In the canter the horse takes the aid from the rider’s inside leg, when the inner hind leg moves forward, because then the horse's belly moves towards the rider’s leg.
Leg aids, like the other aids, should be softened through training. In order to take advantage of these subtle differences in leg aiding and not have to constantly push with effort or even kick, we must not only learn the right technique, but also replace physical strength with a good seat and feel. The horse should then react sensitively to consistent but gentle leg aids. For example, if a horse does not respond to a both-sided forward leg aid just behind the girth, we must increase the aid’s strength until the horse reacts. The leg aid can be supported with a crop/whip. As soon as the horse reacts, the rider’s legs should lie passively at its side. Most horses react correctly the next time the aid is used, and the whip will no longer be necessary.
Giving and restraining rein aids
Each restraining rein aid has to be followed by a giving rein aid. These two aids are also always given together with corresponding seat and leg aids: we use them in all half halts, when flexing and bending and in rein back.
The restraining aid is given by the rider closing their hand for a short moment and turning their wrist in a little. The rider should never stay there – after each restraining aid they have to give, allowing their hand to return to its former position. The rider can also give without restraining first: they move their hand forward a little bit, but without losing the elastic contact with the horse’s mouth. Sometimes, it is not enough to only give this little; we need to give with the whole arm – for example, when we want to extend the frame when lengthening strides, or when we allow the horse to take the reins.
Holding rein aid
The rider’s hand, firmly closed in a fist, remains in place and withstands the horse's increased pressure on the bit until the horse “bounces off” the reins and becomes lighter. The rider must never act backwards and the aid must not last too long. The seat and leg aids have to be given at the same time. This aid is used when the horse goes above or against the bit. The moment the horse relaxes in the poll and accepts the bit, the rider must soften. This is also important for the inside hand when riding turns.

Controlling rein aid
The controlling rein aid complements the inside rein when flexing and bending. The rider releases with their outside rein what they take with their inside rein, so the horse can flex to the inside. The outside rein controls the bend of the neck and stops the horse’s shoulder from falling out.
Sideways motioning rein aid
This rein aid is used mostly with young horses and when teaching lateral work. It shows the horse the way to the side. The rider moves their hand to the side, as if they want to lead the horse there.
HOW TO HOLD THE REINS CORRECTLY
Holding the reins is one of the first things a rider learns.
Holding the reins correctly is not easy and mistakes creep in very quickly: Wrists are curled, inflexible, elbows are stiff, or arms are tense. Every rider and every horse is built differently and may need a slightly different posture to function properly, but it is impossible to have a soft contact with the horse’s mouth if there is tension.
|
|
|
| It's really difficult to hold the reins correctly. This photo was supposed to show how to do it, but a stiffer wrist has caused the hands to turn too far out. | In this photo, the rider's hands are lying palm down, which makes it impossible to give a rein aid simply by turning the wrist; the rider has to use her whole arm. |
|
|
|
| Here, the hands are turned too far out, caused by stiff wrists, straight elbows and tense shoulders. | And here, the rider has her hands too open, which causes the reins to slip and a loss of connection. |
How to correct mistakes when holding reins? Try and hold a cup filled with water in each hand. If your hands aren’t held upright, you will get wet. It might not be very pleasant, but you will notice a difference after a few rides. Do you ride with an open fist? In addition to the reins hold a small sponge in each hand. If you open your fist, you will drop the sponge. If you have problems with your elbows (too straight, too far away from your body) try holding a ball under your arm, above the elbow. TIP: put the balls into tights and hang these around your neck. If you drop the balls they won’t fall to the floor.
We have all heard the command: “hold your hands still!!” The problem is that this command causes the exact opposite; the rider stiffens and the hands move even more.
Egon von Neindorff said: "The hand seems motionless, yet it moves."
In order not to disturb the horse, the hands must follow the movement of the horse. To be able to maintain a light and steady contact, the rider must learn to follow the movement of the horse's head.
Some riders have their hands pushed down towards their thighs. They try to pull the horse's head down. This hand position is too strong and leads to stiffness not only in the rider, but the horse too will probably only resist. Unfortunately, riders are also often seen pulling the reins, right – left. Again, they try to get the horse's head down. Sometimes this nearly borders on “Rollkur”. If you care about your horse, then please don't do it.

In general, you should never pull back with your hands. Such an aid is unpleasant for the horse and will lead to numbness of the mouth. Some riders have a habit of suddenly releasing the rein. This is not ideal either as the horse suddenly loses contact with their rider’s hand, and the subsequent re-taking of the rein is usually too hard. A rider who is able to give a gentle, restraining rein aid can just as gently give with their wrists or fingers. If we want to give more, we can allow the horse to stretch. The rider’s hands stay in place.
REIN LENGTH
Long rein
There is a light connection between the rider's hand and the horse's mouth, the reins do not slack. The rider shortens the reins until they feel a connection to the horse's mouth, but no more.
Short rein
The connection between the rider's hand and the horse's mouth is still light. The shorter rein is the result of collecting the horse, which then lifts the poll and shortens the neck. I will therefore adjust the length of the reins during schooling; I'm not trying to force the horse into an outline by shortening the reins.
HOW TO HOLD THE REINS IN THE DIFFERENT PACES
In walk, the horse's head moves the most. The rider's hand must follow this movement. If we walk in a straight line, then following the movement will not be so difficult. But we need to follow the movement even in exercises, together with giving aids. For example, if we ride on a circle, it is necessary to follow the movement of the horse's head with the controlling outer rein. In trot, the horse's head moves less than in the walk, but often seat problems show up. It is not easy to sit to the trot, but it also isn’t easy to keep our hands still even when rising.

The only thing that helps is to constantly improve and work on our balance in the saddle. In rising trot, we must take care to keep our hands at the same height both when rising and when sitting down. It is therefore necessary to straighten and bend elbows in the rhythm of rising, otherwise our hands will rise with our body. In the canter we also have to follow the movement of the horse's head, like in the walk. A balanced seat and moving our elbows like in the rising trot are very important.
In addition to seat, leg and rein aids we can use our voice, a crop/whip and spurs to make ourselves better understood. Our voice is very important when getting a young horse used to aiding. For older horses, the voice should be used with caution, as horses get used to it very quickly. The use of voice is not allowed when riding dressage tests. When we talk to a horse, the intonation of the voice is important. A calm, deep voice soothes the horse, where a short clicking noise will encourage it. It is good practise to calm the horse using our voice, for example when learning new exercises or when they are afraid of something.

The whip is used to increase the horse's attention. Proper use requires feel. One short and clear use is much more effective than numb tapping. The horse must not be afraid of the whip!! The rider must never use the whip out of impatience.
Spurs are used to soften leg aids. Before using spurs, the rider must be able to use their legs independently on their seat.
One of the most important skills of a rider is to feel. The rider must feel how to influence the horse in the right way, at the right moment, with the right strength and in the right amount with their seat, leg and rein aids. The more the rider learns to feel, the more they can refine their aids.
How do we know that a rider has good feel?
The rider;
To develop feel, you need adaptability, physical dexterity, the ability to react quickly, the ability to concentrate, and a sense of rhythm and movement.
Aids and the giving of aids is a really complex topic. It is therefore always necessary to supplement theory with practise and more practise...
The author of this article, Mariana Broucher, is a BHS accredited coach who originally qualified as an instructor and judge in Germany and The Czech Republic. She is also a qualified Bowen practitioner and has over 20 years experience of teaching internationally. To find out more about her and her work, please visit her website, or read more of her informative articles via her Horsemart Author Page.